
By Ryan Lingenfelter · Cutting Edge Lawn & Landscaping, Garson, Ontario · June 2026
The call came on a Thursday evening in late July. I almost didn’t pick up — it was after seven, I’d been on properties since seven that morning, and I was done for the day.
I picked up.
The woman on the other end was crying. Not dramatically — she caught herself quickly and apologised. But she was genuinely upset. Her name was Sandra. She lived in Greater Sudbury, had owned her house for eight years, and her lawn was in the worst condition it had ever been. She’d been watching it decline for the past four or five weeks. She’d done everything she could think of — watered more, bought fertilizer, tried to overseed a bare section — and nothing was working. Her neighbour’s lawn looked beautiful. Hers looked like it was dying.
“I know it sounds ridiculous to be this upset about a lawn,” she said.
I told her it didn’t sound ridiculous at all. A lawn is the front face of the home you’ve been caring for for eight years. Watching it fail despite your effort is genuinely frustrating. And I told her I’d be there the next morning.
The call — what she told me and what I heard underneath it
While she was describing the lawn on the phone I was already building a picture. Not because I’m particularly intuitive — because the combination of things she was describing pointed in a specific direction almost immediately.
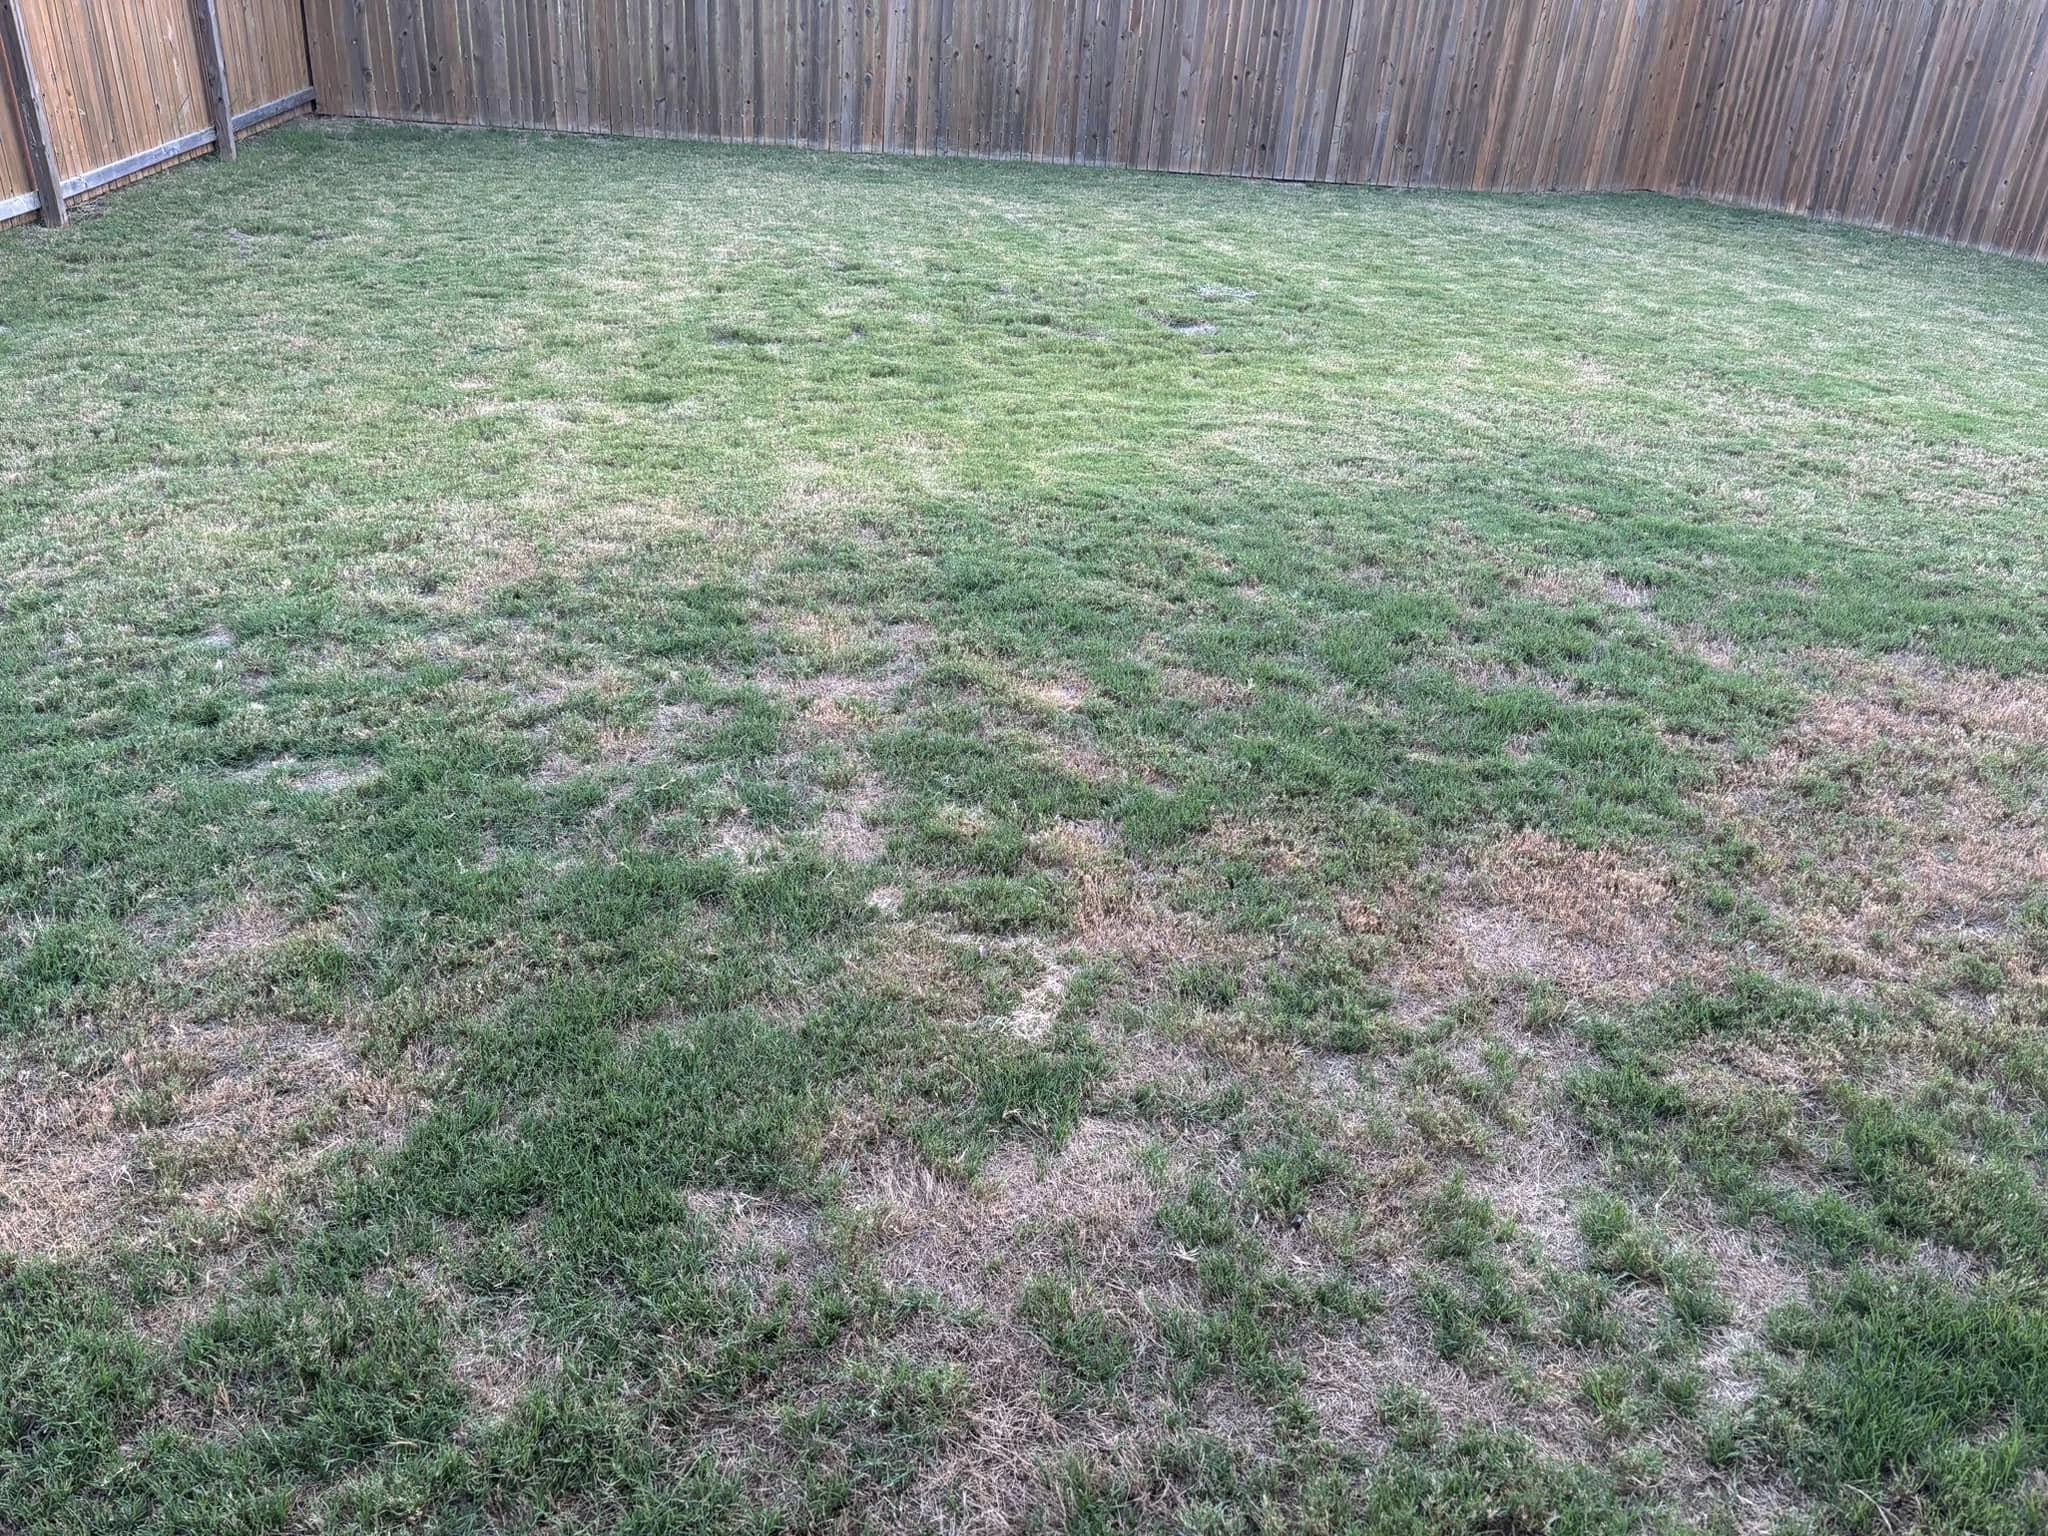
She said the decline had accelerated in the past four to five weeks — which put the start of the visible deterioration in mid to late June. She said the worst sections were the open areas in the middle of the backyard and along the south-facing fence line. She said she’d increased watering when it started getting worse, going from twice a week to daily, and it wasn’t helping. She said the fertilizer she’d applied in early July hadn’t seemed to do anything. She said the bare patch she’d overseeded hadn’t taken.
Mid-June start to visible decline. Worst in the sunny open sections. Increased watering not helping. Fertilizer not responding. Overseeding not taking.
That pattern — almost exactly that pattern — is what I see on lawns with a thatch problem that has hit the summer threshold. The decline accelerates when temperatures rise and the thatch dries out, because dry thatch repels water rather than allowing it to pass through. Increasing watering frequency doesn’t help because the water is still not reaching the roots. Fertilizer applied over thick dry thatch doesn’t move into the soil where it can be used. Overseeding on a thatch layer rather than soil contact produces weak or failed germination regardless of timing.
I’d described this exact progression in the article on what I found on 52 Sudbury lawns this spring — thatch as the most common hidden problem, invisible in spring, damaging in summer. Sandra’s lawn was a textbook case of that article playing out in real time on a specific property.
I didn’t tell her any of that on the phone. I told her I’d see it in person before drawing conclusions. But I was already fairly certain what I was going to find.
What I found when I got there — and what was actually causing it
Friday morning. Sandra met me at the gate looking tired. She’d been worried about the lawn since we’d spoken the night before and hadn’t slept particularly well. She walked me through the yard and pointed out the worst sections — the open middle area, the south fence strip, a corner near a garden bed that had been thin for years.
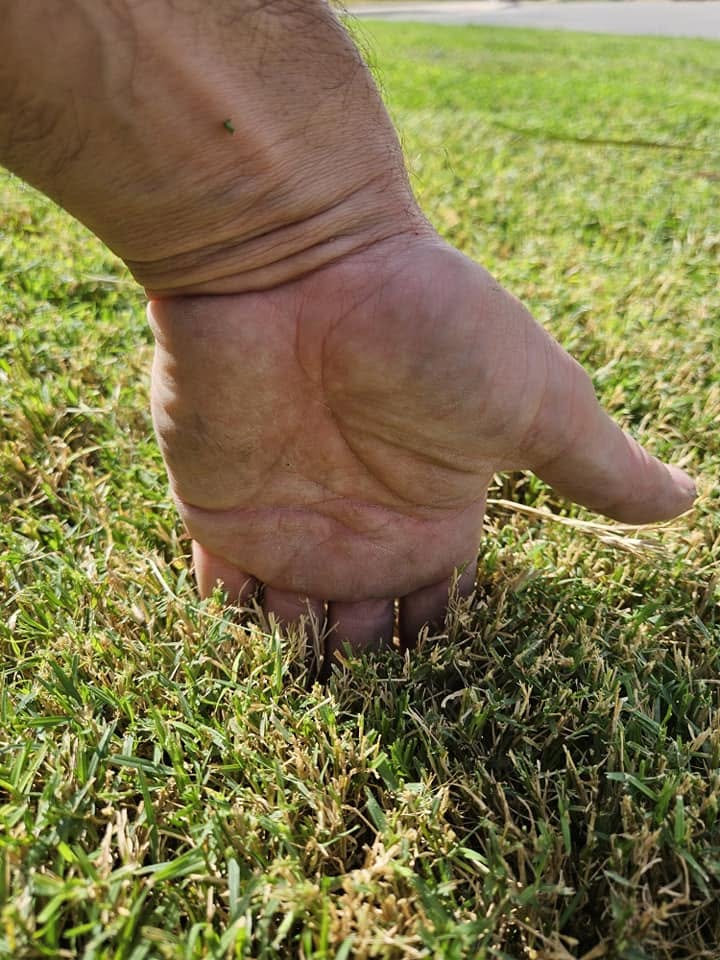
I did the standard assessment sequence. Heel press into the soil — firm, significant compaction throughout, especially in the open middle section where foot traffic was highest. Fingers into the thatch — I found it within the first thirty seconds. An inch and a quarter in the main lawn area. Over an inch and a half in the open middle section. That was the number I was looking for. Anything over an inch in summer conditions is enough to create the water repellency that was producing everything Sandra was describing.
I pulled a root sample from the thin south fence section. Roots at just over an inch deep. That confirmed the picture — the thatch layer had been the moisture zone the grass was growing into, and when the thatch dried out in the July heat the roots had no depth to draw from.
I asked Sandra when the lawn had last been aerated. She said she didn’t think it ever had been — not by her in eight years, and she wasn’t sure about the previous owners. That meant eight or more years of thatch accumulation without the aeration that would have broken it down naturally each spring. The inch and a quarter I was finding wasn’t from one bad season. It was the compound result of every season since the last aeration, building a little more each year until it crossed the threshold where it started visibly damaging the lawn.
I also checked the mower. She’d been cutting at two inches. I asked her how she’d decided on that height and she said she just liked it short and neat. She hadn’t known there was a better height for the grass’s health — the same situation as the homeowner in the article about the lawn problem that was a 10-second fix. Wrong cutting height, years of accumulation, summer heat revealing what had been building invisibly for a long time.
So: no aeration in at least eight years, thatch at an inch and a quarter, cutting height at two inches, roots at just over an inch deep. Those four things together explained every symptom she’d described on the phone. The increased watering wasn’t helping because the water wasn’t getting through the thatch. The fertilizer wasn’t working because it was trapped in the organic layer. The overseeding hadn’t taken because the seed had no soil contact. The decline had accelerated in July because that’s when the thatch dried out and started repelling rather than absorbing.
None of it was her fault. She’d been doing what she thought was right with the information she had. Nobody had told her about thatch. Nobody had told her cutting height mattered for grass health. Nobody had told her that aeration was the thing preventing all of this from building in the first place.
I sat down with her and explained everything I’d found, as clearly as I could without making her feel worse about it. The problems were real. They were also completely fixable. And the fix, while it would take a few weeks to show fully, was straightforward.
What we did — the exact sequence over the following three weeks

Here is precisely what we did, in order, and why each step came before the next.
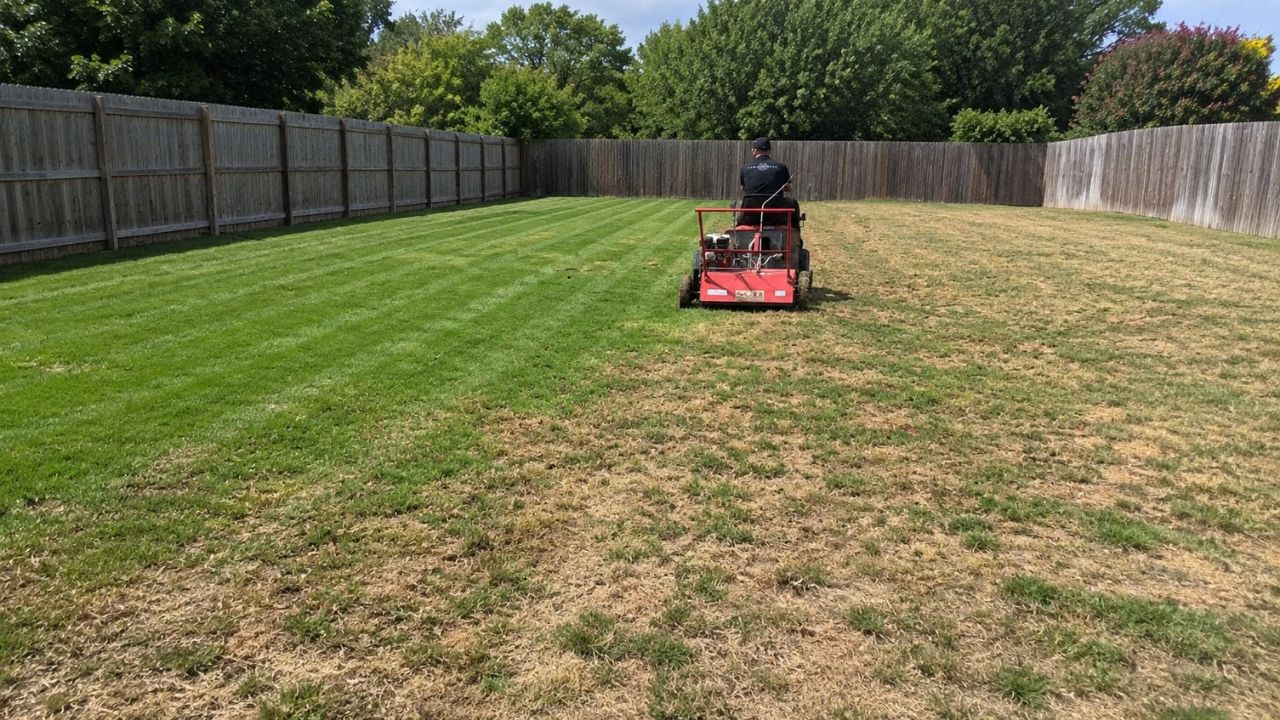
Day one — power dethatch the full lawn. With thatch over an inch, aeration alone wouldn’t resolve it fast enough. Power dethatching pulls the accumulated organic layer physically out of the lawn. The lawn looks rough immediately after — Sandra warned me she was going to be shocked — but what you’re left with is a clean surface with dramatically improved conditions for everything that follows. We removed a significant volume of debris. The lawn looked worse on day one than it had the day before. That’s normal and expected.
The reason dethatching came before aeration rather than the other way around: aerating through thick thatch produces shorter, less effective plugs because the tines pass through organic material before reaching soil. Remove the thatch first, then aerate into clean surface, and the aeration does its full job. I’d described the correct sequence — dethatch then aerate, not aerate through thatch — in the article on when to overseed a Sudbury lawn.
Day two — core aeration, full property, double pass on the middle section. With the thatch removed, the aeration tines reached proper depth. Double pass on the heavily compacted middle section where foot traffic had been highest. Single pass everywhere else. The aeration holes created the channels for water and nutrients to move into the soil and gave the overseeding that followed direct soil contact points across the entire lawn.
Day two, immediately after aeration — overseed and starter fertilize. We broadcast a fescue-dominant blend with Kentucky bluegrass at four pounds per thousand square feet across the full lawn — heavier in the bare and thin sections. Starter fertilizer applied at the same time: lower nitrogen, higher phosphorus to support root development in the germinating seed. The aeration holes provided ideal seed-to-soil contact throughout. Under normal conditions in late July — which is later than the optimal late May window I described in the article on the best time to aerate a Sudbury lawn — germination would take slightly longer than in spring and establishment would be somewhat slower. But the conditions were still viable, particularly because the dethatching and aeration had so significantly improved the surface’s ability to hold moisture for germinating seed.
Day two — mower deck adjusted to three inches. Sandra watched me do it. I showed her the difference between position two and position four on her deck dial, showed her what three inches looked like on the blade, and explained why this was the single most important ongoing change she could make. From that day forward, three inches minimum through the rest of the season. I asked her to put a piece of tape on the mower handle at position four so she’d never accidentally drop it back down.
Watering instruction — switch from daily light to deep twice weekly. I set her irrigation controller before I left. Two sessions per week on her permitted bylaw days — long enough to wet the soil to four to five inches. No more daily twenty-minute sessions. The thatch was gone, the aeration holes were open, the water would now reach the roots instead of running off a hydrophobic organic layer. The twice-weekly deep schedule would also start training the new root system to go deeper rather than staying at the surface where daily moisture had kept it. The watering bylaw details and the deep watering approach are covered in the article on Sudbury lawn care news 2026.
Week two — first post-treatment cut. By day ten the germination was visible across most of the seeded area — new grass coming through the aeration holes, thin but present. I came back and cut the existing grass at three and a half inches — slightly above the new maintenance height to avoid stressing the new seedlings. Left the clippings on the lawn as light mulch over the germinating areas.
Week three — second cut and assessment. By day twenty-one the recovery was clearly underway. The new grass was at about an inch in most areas. The existing grass — which had been pale and stressed — was visibly greener and more upright at the correct cutting height. The middle section, which had been the worst area, was filling in. The south fence strip had improved from what looked like near-dead to stressed but recovering.
What she said six weeks later — and what I want every Sudbury homeowner to know

Six weeks after we did the work, Sandra sent me a series of photos and a voice message. The voice message was about forty-five seconds long. She said the lawn looked better than it had at any point in the eight years she’d owned the house. The middle section that had been the worst was dense and green. The south fence strip was almost fully recovered. The neighbour’s lawn that had been making her feel bad about her own looked comparable now rather than dramatically better.
She said she wished someone had told her about thatch and aeration and cutting height eight years ago when she moved in. She wouldn’t have spent eight summers watching the lawn drift slowly in the wrong direction if she’d understood what was actually driving it.
That’s the thing I want every Sudbury homeowner to take from this story.
Sandra’s lawn didn’t decline because she didn’t care. It declined because the three things driving the decline — thatch accumulation, no aeration, wrong cutting height — are invisible in their early stages and only become dramatically visible when summer heat amplifies them. By the time the problem is visible, it has usually been building for multiple seasons. The homeowner experiences it as a sudden crisis in July. The reality is that it was a slow accumulation that crossed a threshold.
The good news is that all three of those things are preventable rather than just treatable. Annual aeration in the late May window keeps thatch from building and compaction from accumulating. Three-inch cutting height maintained consistently prevents the shallow root system that makes every stressful period hit harder. Those two things — aeration every year, correct cutting height every cut — handle the majority of what produces a lawn like Sandra’s by late July. I’ve covered both in the articles they deserve: the best time to aerate a Sudbury lawn for the timing and reasoning behind annual spring aeration, and the complete 2026 homeowner reference for the full seasonal approach that keeps everything else in order.
If your lawn is showing signs this summer of what Sandra was describing — accelerating decline in the sunny sections, watering that isn’t helping, fertilizer that isn’t responding — give me a call. The sooner in the season the better, but even in late July there is meaningful recovery possible before the season ends.
📞 705-507-6787 | Get a free quote online
— Ryan Lingenfelter
Owner, Cutting Edge Lawn & Landscaping
Garson, Ontario · 705-507-6787
